Let’s Encrypt SAN Certificate With Citrix Netscaler (TAKE 2)
This post covers a method using Python and Bash to automate the renewal and updating of a Netscaler SSL certificate with Let’s Encrypt making it possible to use SAN or single named certficates.
Introduction
Updates
07-25-16: Thanks Yuth for pointing out some issues!
08-30-16: Removed apache to make things easier. Changed hook_chain to ‘no’. Recreated repo to use sub module.
09-21-16: Letsencrypt.sh changed the project name to dehydrated. Updated scripts and this post to reflect.
03-03-17: Added option to connect HTTPs and set as default connection method. Must now have connectiontype variable in mynsconfig.py. (eg connectiontype = “https”)
06-01-17: If errors are encountered like the one below while connecting to the Netscaler via HTTPS. See Github issue
requests.exceptions.SSLError: [SSL: TLSV1_ALERT_INTERNAL_ERROR] tlsv1 alert internal error (_ssl.c:590)
or
("bad handshake: Error([('SSL routines', 'ssl3_read_bytes', 'tlsv1 alert internal error')],)",)
-
First Option: Run the following command
pip install ndg-httpsclient pyasn1 --upgrade -
Second Option: Change ciphers on HTTPS nsip service . Tested with Default cipher group
-
Third Option: Use HTTP to connect
01-19-18: Updates for version of LE and Dehydrated. Updates to hook scripts. Added account registration command to blog. (Thanks Tobias and Jeff).
02-01-18: Added Netsaler connectivity check
05-01-18: Simplified deployment, a policy is created for every challenge and then removed, better error handling and works with new version of Dehydrated
05-02-18: Support for multiple certificates\domains
This process works by using a Linux server to request the certificate and a Netscaler Responder Policy to answer the response challenges from LetsEncrypt. The Netscaler policy is modified automatically to handle the challenge via the Linux server. Once the challenges are accepted from LetsEncrypt and the new certificate created, the Linux server will update the certificate pair on the Netscaler via REST API using a Python script.

What’s Needed?
To get started we will need the following:
- Base understanding of Linux and Netscaler
- Linux server configured with static IP, SSH and root access (used Ubuntu 14.04\16.04 for this post)
- All paths in scripts assume root is used
- Netscaler configured with either a content switch or LB VIP exposed to internet on port 80. (Can be existing without impact to existing services)
- External DNS entries pointing to content switch or LB IP (e.g. domain1.mydomain.com domain2.mydomain.com domain3.mydomain.com)
Enable Responder Feature
We need to first enable the responder feature on the Netscaler
enable ns feature responder
Configure Linux Server
SSH into server with root and install the required packages (remember I used Ubuntu)
apt-get install python git python-pip curl
pip install requests
Clone the repository with dehydrated, configs and created scripts
git clone --recursive https://github.com/ryancbutler/ns-letsencrypt
Copy the dehydrated configuration example files to be used
cd ~/ns-letsencrypt
cp domains.txt.example domains.txt
cp config.sh.example config.sh
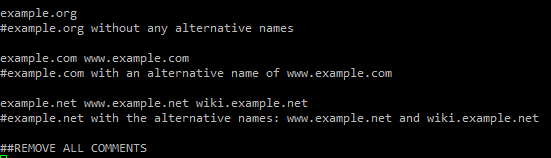
Edit the domains.txt file to reflect domain(s) certificate needs. Make sure to remove all comment lines.
Note: If you ever need to add additonal alternative names they should be added to the end of the line and not the front otherwise a new private key will be created which will cause issues.
nano domains.txt
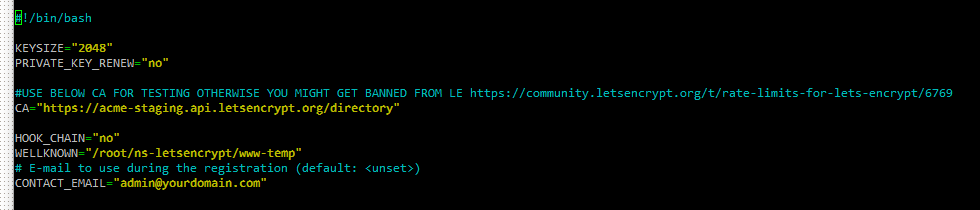
Edit config.sh for “contact_email” to receive expiration notices or comment “CA” to use LetsEncrypt production CA.
LE is very stringent on API rate limiting and you run the riskof being banned for a long time period if you’re not careful! Highly suggest using the testing CA for now!
nano config.sh
cp mynsconfig.py.example mynsconfig.py
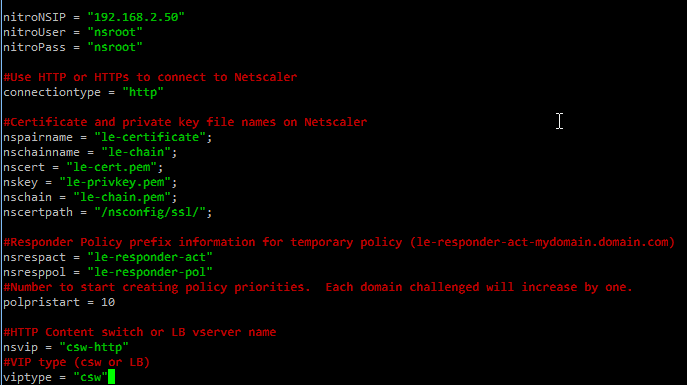
Edit mynsconfig.py to reflect your environment. If you have been following along verbatim not too much needs to be changed here other than Netscaler login info and either the HTTP LB or CSW name to use for the challenges.
nano mynsconfig.py
Let’s test our Netscaler connectvity
/root/ns-letsencrypt/ns-copytons.py test
Let’s register the account and domain with LE (only needs to be done once)
/root/ns-letsencrypt/dehydrated/dehydrated -f /root/ns-letsencrypt/config.sh --register --accept-terms
Now lets create our initial certificate and check for errors
/root/ns-letsencrypt/ns-cronjob.sh
After command is run verify challenges are successful and there are no errors. Certificate and chain should also be available on the Netscaler. Certificate files are created under /root/ns-letsencrypt/certs/ (e.g. /root/ns-letsencrypt/certs/mydomain1.domain.com/)
At this point the le-certificate can be bound to SSL services or VIPS and fully trusted as long as you are not using the test CA. The current certificate will only be valid for 90 days until a renewal has to take place. Now lets add some automation where we don’t have to worry about this.
Force Renewal
If you need to force a certificate renewal run
/root/ns-letsencrypt/ns-forcerenew.sh
Automate Renewal
After the initial LE certificate is created we can now configure our automation to take care of the renewal process. Lets go back to the Linux server to finish up.
The scripts are now ready to run so we will use cron to schedule the renewal check.
crontab -e
For this example I run the job once a month on the 1st day of the month at 12AM.
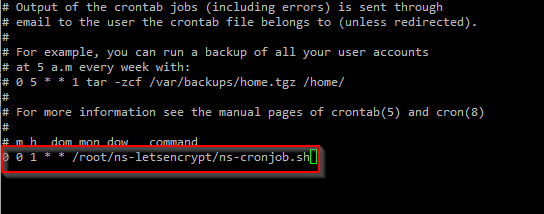
0 0 1 * * /root/ns-letsencrypt/ns-cronjob.sh
Note: The renewal process will only take place when the certificate is close to expiration. If you would like to force renewal each time use ns-forcerenew.sh script instead.
We are now fully configured to renew our Let’s Encrypt certificate and update the pair on the Netscaler automatically!
To update repo
cd ~/ns-letsencrypt
git pull
git submodule update --init --recursive
Move from ‘test’ to ‘prod’ CA
If you have been using the test CA to validate and would like to move to the production CA you will need to complete the following:
- Remove test certificate pair and chain along with files (le-*) on Netscaler
- Remove certificate folder found in /root/ns-letsencrypt/certs/
- Comment ‘CA’ line within ~/ns-letsencrypt/config.sh
- Re-run (/root/ns-letsencrypt/ns-cronjob.sh) to create certificates and bind on Netscaler. (May need to register again.)
- Now converted to production CA
Make sure you watch the rate limiting!!
Optional: Create a Netscaler API service account
Andreas H. posted a quick Netscaler CLI command to create a restricted user account which only allows the required permissions to perform the certificate update operations. This is a great idea and wanted to post it here.
(^(add|rm|set|show)\s+responder\s+policy)|(^(add|rm|set|show)\s+responder\s+policy\s+.*)|(^(set|show)\s+responder\s+action)|(^(set|show)\s+responder\s+action\s+.*)|(^(add|rm)\s+system\s+file.*-fileLocation.*nsconfig.*ssl.*)|(^(add|link)+\s+ssl\s+certKey\s+le-.*)|(^(update|show)\s+ssl\s+certKey)|(^(update|show)\s+ssl\s+certKey\s+.*)|(^save\s+ns\s+config)|(^save\s+ns\s+config\s+.*)
The regex limits the user to
- add, change and remove the responder policy/action
- add/remove system files in the location /nsconfig/ssl
- add/link certificates which names start with le-
- update certificates
- save ns config
If you create a user with this policy you don’t have to use the nsroot user and you do not store the root password in the mynsconfig.py
Leave a comment